
How To Set Up Automated Blog Publishing
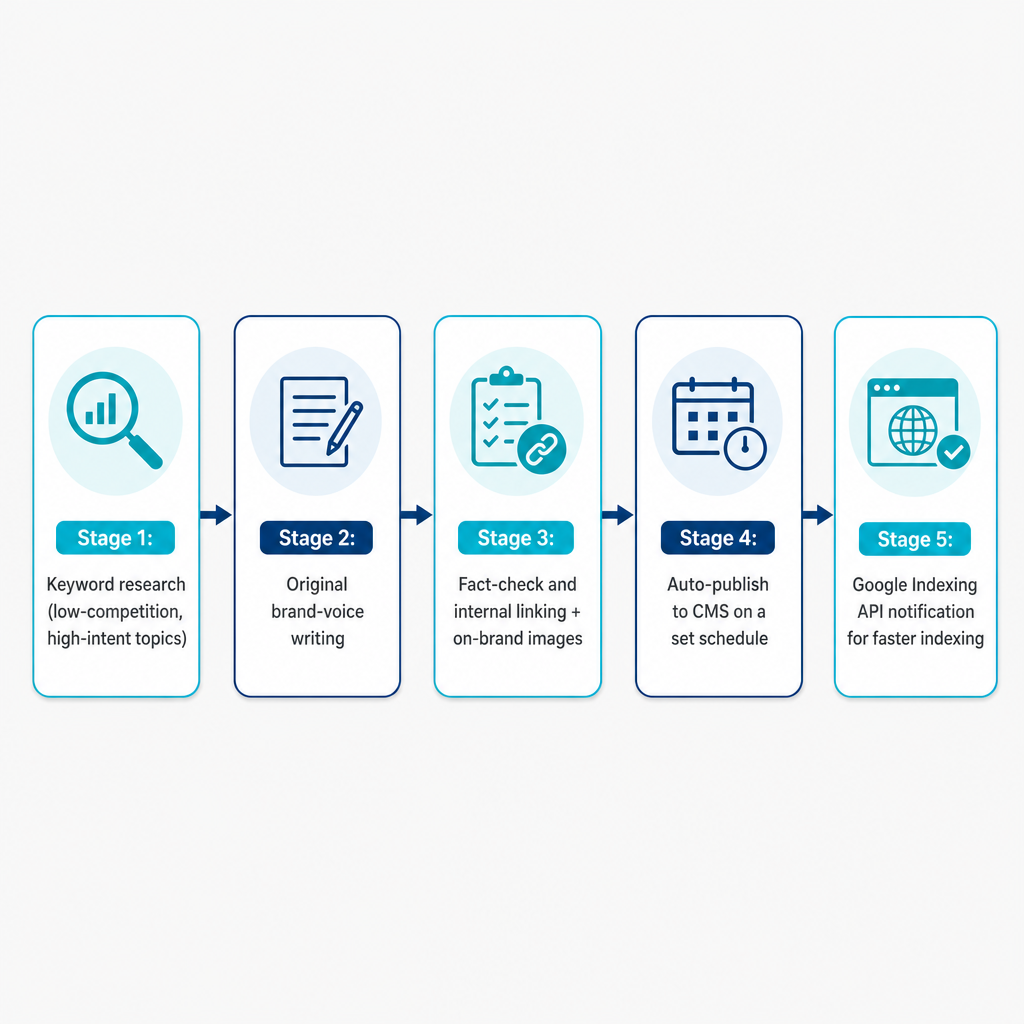
Setting up a blog that publishes researched, fact-checked, on-brand posts on a schedule sounds like a big engineering project. With the right platform, it isn't. If you want to know how to set up automated blog publishing, the honest answer is that most teams can connect their site, define their brand voice, and choose a cadence in a single working session — often under an hour of hands-on work — and pay less than the cost of a single part-time writer. The heavier lift is deciding what you want the content to achieve before you switch anything on.
This is a practical walkthrough for that first setup: what you need in place, the exact order of steps, where teams trip up, and when building your own stack actually makes sense versus using a platform like ours.
Table of contents
- • What you need before you start
- • Setting it up step by step
- • Common mistakes and how to fix them
- • Build your own stack or use a platform
- • Frequently asked questions
What you need before you start
Automated publishing works only when a few foundations are already in place. Missing one of these is the most common reason a setup stalls halfway through.
- A live site on a supported CMS. We connect to WordPress.org, WordPress.com, Shopify, Webflow, Wix, Notion, or a custom CMS via API and webhooks. Most existing business blogs plug in without rebuilding anything.
- Admin-level CMS access. You need to authorize us to create, publish, and update posts, upload media, and manage categories and tags. A contributor-level login will block publishing.
- An AymarTech plan that includes auto-publishing. Draft-only generation and full auto-publishing are different scopes; confirm your plan covers publishing to your site. Current options are on our pricing page.
- A clear brand voice and positioning. Who you serve, how you speak, and what you actually sell. This is the raw material we use to write on-brand rather than generic.
- Defined growth goals. Target regions, priority product or service lines, and any topics that need human review before going live.
- Google Search Console access for your domain. Verified site ownership is what lets indexing align correctly with your property.
- About an hour for onboarding. Connecting the CMS, filling in your business profile, and picking a schedule is a one-time session for most teams.
If you're still deciding whether a hands-off content engine fits your model at all, our overview of autopilot content marketing covers the strategic case before you commit to setup.
Setting it up step by step
The order matters. Each step below unlocks the next, and skipping ahead to auto-publishing before the profile is solid is exactly what produces off-brand early posts.
Step 1: Clarify your content and SEO goals
Decide what success looks like: more organic leads, traffic to specific product pages, or stronger AI visibility so your brand gets cited inside tools like ChatGPT, Claude, Perplexity, and Gemini. Our keyword engine targets low-competition, high-intent topics, but it produces sharper results when your priorities and audiences are explicit rather than assumed.
Step 2: Create your account and choose a plan
Sign up and select a plan that includes automated publishing and indexing, not just draft generation. Plans are built for small businesses, SaaS and startup founders, and marketing teams that want daily or weekly SEO content without hiring writers or juggling separate tools. Expect the monthly cost to land closer to a single freelance article than a full content hire; exact figures are on the pricing page.
Step 3: Connect your CMS
Inside AymarTech, choose your platform and authorize access. For WordPress or Shopify this usually means authenticating via your site URL and API credentials or a secure plugin/app connection, then granting permission to create, publish, and update posts, upload images, and manage tags and categories. Once connected, we write and publish directly to your blog with no one logging into the CMS per article.
Step 4: Build your business profile and brand voice
This is the step that separates on-brand content from filler. In your profile you define your company overview and core offerings, your audience segments, your voice preferences (formal versus conversational, technical versus plain-language), and any phrases to use or avoid. Add compliance notes here too — for example, regulated claims that must route to human review. We use this profile to generate original, on-brand articles instead of generic AI text.
Step 5: Configure schedule and scope
Choose your cadence — daily, several times a week, or weekly — and where posts land. Map the target categories or collections in your CMS, such as "Blog," "Resources," or "Guides." We support over 150 languages, though U.S.-focused businesses typically publish in English with U.S. search intent in mind. A sensible starting point is two to three posts a week, then scaling once you've confirmed quality.
Step 6: Enable topic and keyword automation
Confirm that automated keyword research is on and tied to your products, services, and audience, so you don't run a separate keyword tool. Add any seed themes you definitely want covered, and set your internal linking priorities — the pages that matter most for conversions — so each post reinforces your key offers. From here the platform generates ideas, outlines, and full posts aligned to your goals and voice.
Step 7: Turn on auto-publishing and indexing
Once you're comfortable with the drafts, switch selected categories from draft-only to auto-publishing on your chosen schedule. In parallel, we notify Google through its Indexing API when new articles go live or existing URLs change. The API accepts requests to the indexing.googleapis.com service that include the URL and whether it was updated or removed, which can refresh Google's index faster than passive crawling alone. Its prerequisites — enabling the API, creating a service account, verifying ownership in Search Console, and authenticating with the correct scope — are part of our infrastructure, so you don't write any code. Google documents the request flow in its Indexing API guide.
Step 8: Run a pilot and review
Before fully committing, run a two-to-four-week pilot at your chosen cadence. Read each article for accuracy, tone, and compliance; our content is fact-checked and original, but domain-specific claims still benefit from a human eye. Confirm internal links point to the right product, feature, or signup pages, and check that posts appear correctly in your CMS with featured images, metadata, and clean URLs. Adjust your profile and rules based on what you find.
Step 9: Monitor and refine
Automated does not mean untouched — your effort shifts from writing to oversight. Track organic traffic and rankings in Search Console and your analytics, watch conversions from blog traffic to refine CTAs, and update your profile whenever your offers or positioning change. That feedback loop is what makes the output steadily more effective while your team stays on higher-level work. For the mechanics behind why this consolidation matters, our guide to AI-powered SEO tools is a useful companion.
Common mistakes and how to fix them
Most setup problems trace back to a handful of predictable errors. Fix them early and the system runs cleanly.
| Mistake | What goes wrong | Fix |
|---|---|---|
| Vague brand voice | Early posts read generic or off-brand | Strengthen your profile with clear tone and audience detail |
| Wrong environment | Content publishes to a staging site, invisible to visitors | Confirm the production domain and CMS instance before enabling |
| Cadence too aggressive | No capacity to sample-review daily output | Start at a sustainable pace, then scale as confidence grows |
| Skipped internal linking | Priority pages get no link equity | Set your key URLs so posts emphasize important offers |
| Messy categories and tags | Posts become hard to find | Standardize taxonomy first, then map it in AymarTech |
| Unverified indexing | New URLs sit unindexed | Check Search Console coverage; confirm ownership and API setup |
| "No oversight" mindset | Regulated or legal claims slip through | Set a human sign-off policy for sensitive topics |
The last row is the one teams underestimate. Evergreen SEO content can safely run on autopilot; legal language, regulated claims, and highly technical assertions deserve a review gate. Automation removes the manual production work, not your judgment.
Build your own stack or use a platform
You could assemble your own pipeline: a keyword tool, a generic AI writer, an image generator, CMS plugins, and custom scripts hitting Google's Indexing API. It's technically possible. It also means ongoing developer time, careful orchestration between tools that weren't designed to talk to each other, and constant maintenance whenever one piece changes.
Here's the honest decision boundary:
- Build it yourself if you have an engineering team dedicated to internal tooling and complex content workflows, and you're prepared for higher upfront and maintenance costs. For a handful of very large operations, that control is worth it.
- Use a platform if you want reliable SEO content and AI visibility without hiring a content team or maintaining custom infrastructure. We consolidate research, writing, fact-checking, imagery, internal linking, publishing, and indexing into one system that plugs directly into your CMS.
For most small businesses, SaaS founders, and marketing teams, the maintenance burden of a homegrown stack quietly outweighs its flexibility. The pragmatic path is to run the pilot, review a batch of live posts, and let the automation layer handle the plumbing.
Frequently asked questions
How long does it take to set up automated blog publishing?
Most businesses connect their CMS, complete their business profile, and configure a schedule within a single working session, because the core steps are limited to account creation, site connection, and profile setup.
Which CMS platforms are supported?
We integrate with WordPress.org, WordPress.com, Shopify, Webflow, Wix, Notion, and custom sites via API and webhooks, publishing directly into the blog or content section of your existing site.
Will my posts be indexed on Google automatically?
After publishing, we use Google's Indexing API to notify Google about new or updated URLs, which can help fresh content enter the index faster than relying on standard crawling alone.
Can I approve content before it goes live?
Yes. You can keep posts in draft for human review or enable auto-publishing once you're confident in the output for your brand and industry. Both workflows are available.
Is automated publishing safe for my brand voice?
We write from a detailed business profile to match your voice and produce original, fact-checked content rather than generic AI text. Safety comes from that profile plus your own review policy for sensitive topics.